Mailers
Whether your application is providing service to a customer, or an e-commerce application, it is a recommended practice to send mails to customers for each of their transactions.
Thankfully, Intent comes with a mailer integrated which you can use to quickly send e-mails to your users without even writing a single line of html.
It comes with a pre-built email template which you can use to make your templates using class-based syntax.
Configuration
The configuration for mailer is available at config/mailer.ts. Before using it, you will need to configure it. Below example shows how to configure a smtp provider for sending out email.
import { configNamespace } from '@intentjs/core/config';
import { MailerOptions } from '@intentjs/core/mail';

export default configNamespace(
  'mailers',
  () =>
    ({
      default: 'marketing',
      channels: {
        marketing: {
          provider: 'smtp',
          host: process.env.MAIL_HOST,
          port: process.env.MAIL_PORT,
          username: process.env.MAIL_USER,
          password: process.env.MAIL_PASSWORD,
          ignoreTLS: false,
          requireTLS: false,
          from: 'hi@tryhanalabs.com',
        },
      },
      template: {
        appName: process.env.APP_NAME,
        footer: {
          title: process.env.APP_NAME,
        },
      },
    }) as MailerOptions,
);
While smtp provider should be able to handle your email needs, Intent comes with multi-provider support so that you can use other providers as well.
Intent currently supports following providers.
SMTP Configuration
To configure SMTP server in your application, you can define the following configuration inside the channels attribute. You should be able to get the following mentioned credentials from your SMTP provider, such as AWS SES.
channels: {
  marketing: {
    provider: 'smtp',
    host: process.env.MAIL_HOST,
    port: process.env.MAIL_PORT,
    username: process.env.MAIL_USER,
    password: process.env.MAIL_PASSWORD,
    ignoreTLS: false,
    requireTLS: false,
    from: process.env.FROM_ADDRESS,
  },
},
Mailgun
To configure mailgun as a mail provider in your application, you can do so by
INFO
You can get the mailgun's api key and username from it's console.
channels: {
  transactions: {
    provider: 'mailgun',
    username: process.env.MAILGUN_USERNAME,
    key: process.env.MAILGUN_API_KEY,
    domain: process.env.MAILGUN_DOMAIN,
    from: process.env.FROM_ADDRESS,
  },
},
Resend
To configure resend as a mail provider in your application, you can do so by
channels: {
  resend: {
    provider: 'resend',
    apiKey: process.env.RESEND_API_KEY,
    from: process.env.FROM_ADDRESS,
  }
}
Build Mails
One of the best feature about Intent Mail is that it comes with a pre-defined template which you can use to quickly start sending out email to your users without even writing a single line of html.
For example, let's take a look at the quick mail generated using Intent.
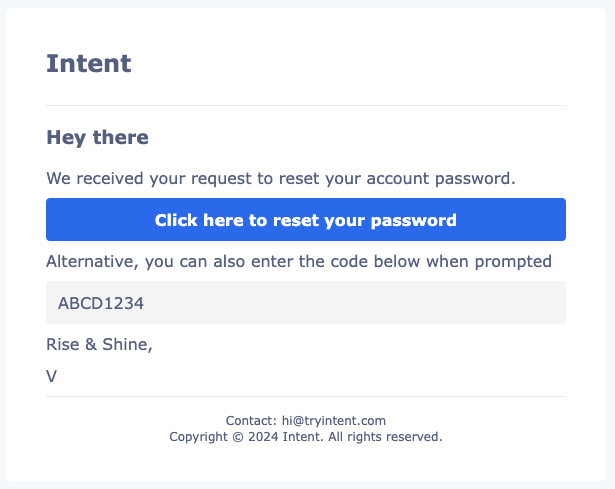
Now, let's take a look at the code written to get this output.
import { MailMessage } from '@intentjs/core/mail';

MailMessage.init()
  .greeting('Hey there')
  .line(
    'We received your request to reset your account password.',
  )
  .button('Click here to reset your password', 'https://google.com')
  .line('Alternative, you can also enter the code below when prompted')
  .inlineCode('ABCD1234')
  .line('Rise & Shine,')
  .line('V')
  .subject('Hey there from Intent')
INFO
Intent Mail templating is made possible using react.email. It's a react-based mailing library which you can use to generate mailing templates at ease.
Built-In Template
Intent ships a MailMessage class which you can use to generate mails on the fly.
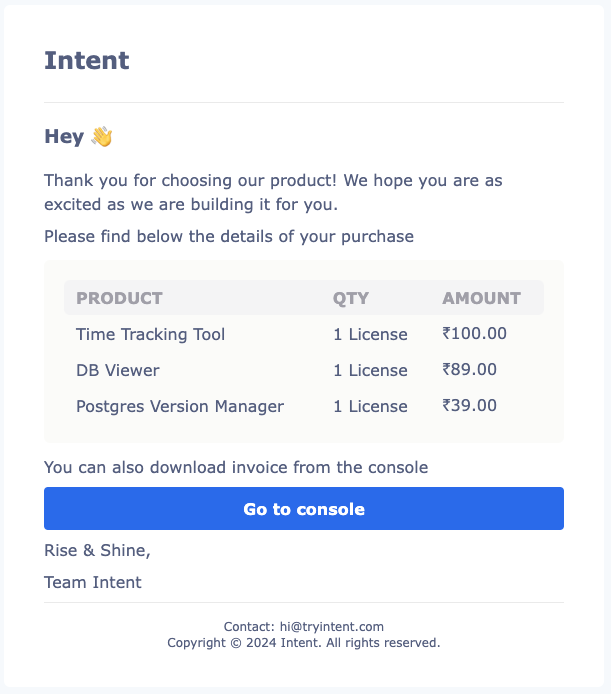
Let's take a quick look on how you can use MailMessage to build emails.
MailMessage.init()
  .greeting('Hey 👋')
  .line(
    'Thank you for choosing our product! We hope you are as excited as we are building it for you.',
  )
  .line('Please find below the details of your purchase')
  .table([
    ['Product', 'Qty', 'Amount'],
    ['Time Tracking Tool', '1 License', '$100'],
    ['Time Tracking Tool', '1 License', '$100'],
    ['Time Tracking Tool', '1 License', '$100'],
  ])
  .line('You can also download invoice from the console')
  .button('Go to console', 'https://google.com')
  .line('Rise & Shine,')
  .line('Team Intent')
The above snippet will generate the following email:
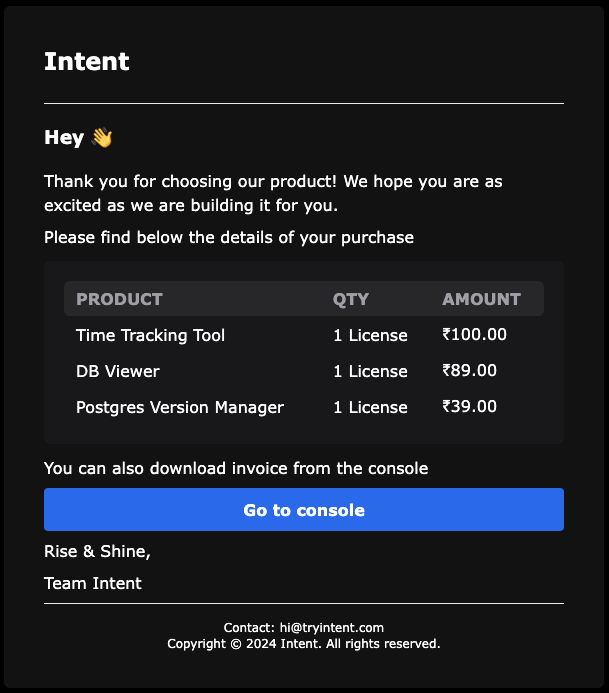
There's more, if you would like to get the email in the dark mode, you can just use the dark() method inside the MailMessage class.
.dark()The mail will now look like following
We have also added multiple methods which we believe will be helpful.
To add a link inside an email, you can use the link method
.link('Try Intent', 'https://tryintent.com')If you would like to highlight a text (for example, OTP, or a code), you can use inlineCode method
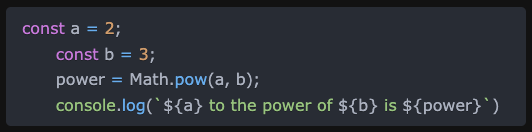
.inlineCode('1234-5678-90123')You can also make use of the code method to add a code block in your email.
const codeSnippet = `
const a = 2;
const b = 3;
power = Math.pow(a, b);
console.log(\`\${a} to the power of \${b} is \${power}\`)
`
.code(codeSnippet, { lang: 'ts' })
This will automatically add a typescript code snippet in your email, like below
Custom Templates
We have added the support for JSX elements, ie React Components (built on top of react.email components), to make the development of mail feel like breeze.
You can use any react.email based component in Intent. Let's take a quick look at custom component.
import {
Body,
Button,
Container,
Head,
Html,
Link,
Preview,
Section,
Text,
} from '@react-email/components';
import * as React from 'react';
interface DropboxResetPasswordEmailProps {
userFirstname?: string;
resetPasswordLink?: string;
}
export const ResetPasswordEmail = ({
userFirstname,
resetPasswordLink,
}: DropboxResetPasswordEmailProps) => {
return (
<Html>
<Head />
<Preview>Reset your password</Preview>
<Body style={main}>
<Container style={container}>
<Section>
<Text style={text}>Hi {userFirstname},</Text>
<Text style={text}>
Someone recently requested a password change for your Dropbox
account. If this was you, you can set a new password here:
</Text>
<Button style={button} href={resetPasswordLink}>
Reset password
</Button>
<Text style={text}>
If you don't want to change your password or didn't
request this, just ignore and delete this message.
</Text>
<Text style={text}>
To keep your account secure, please don't forward this email
to anyone. See our Help Center for{' '}
<Link style={anchor} href='https://dropbox.com'>
more security tips.
</Link>
</Text>
<Text style={text}>Happy Dropboxing!</Text>
</Section>
</Container>
</Body>
</Html>
);
};
const main = { backgroundColor: '#f6f9fc', padding: '10px 0' };
const container = {
backgroundColor: '#ffffff',
border: '1px solid #f0f0f0',
padding: '45px',
};
const text = {
fontSize: '16px',
fontFamily:
''Open Sans', 'HelveticaNeue-Light', 'Helvetica Neue Light', 'Helvetica Neue', Helvetica, Arial, 'Lucida Grande', sans-serif',
fontWeight: '300',
color: '#404040',
lineHeight: '26px',
};
const button = {
backgroundColor: '#007ee6',
borderRadius: '4px',
color: '#fff',
fontFamily: ''Open Sans', 'Helvetica Neue', Arial',
fontSize: '15px',
textDecoration: 'none',
textAlign: 'center' as const,
display: 'block',
width: '210px',
padding: '14px 7px',
};
const anchor = {
textDecoration: 'underline',
};Once you have made the custom component, you can now use the view method to build your mail.
import { ResetPasswordEmail } from 'resources/mail/resetPassword';

MailMessage.init().view(ResetPasswordEmail, {
  userFirstname: 'Vinayak',
  resetPasswordLink: 'https://dropbox.com',
});
Raw Template Strings
You can also use raw html to build your mail. To do so, you can use the raw method.
const user = { name: 'Rahul' };
const mail = MailMessage.init()
  .raw(`Hello ${user.name}, <br />Welcome to our platform!<br />Thank you!`)
Preview
The preview method let's you control the description of the mail that will be shown to the user in their inbox.
MailMessage.init()
  .preview(`Summary for your purchase #1234`)
Subject
To set the subject for the mail, you can call the subject method on mailMessage.
mail.subject('Invoice #12345 has been paid. Yay!');Attachments
To attach file(s) with your email, you can make use of attach() method.
| Parameter | Description |
|---|---|
| filename | filename to be reported as the name of the attached file. |
| content | Attachment Object |
Let's say you have the file hosted somewhere, you can do it like
mail.attach('invoice.pdf', {
  url: 'https://link.com/invoice.pdf',
});
Alternatively, you can also pass the buffer of the file to the attach method.
const fileData = await Storage.disk('local').get('orders/invoice_1234.pdf');
mail.attach('invoice_1234.pdf', {
  content: fileData,
});
INFO
For providers other than smtp, the attachment is automatically converted to Buffer.
Debugging Mails
Sometimes, you may want to see the final template that will be built out of the mail object.
This can be extremely helpful to check if your mail is using the dynamic content as intended. Another quick usage is to check the HTML rendered by calling the various Mail builder methods.
You can do so by calling the toHtml method, which returns the complete HTML string that will be sent in the mail.
const mail = MailMessage.init().greeting('Hello there');

console.log(mail.toHtml());
// prints the html of the mail
Custom MailMessage
While MailMessage on its own will be sufficient in most cases, there can be situations where you may want to add some piece of logic that is specific to a mail. To do this, you can create a custom class extending MailMessage and define a handle method.
Let's take a quick look at how you can create custom MailMessage class.
import { Num } from '@intentjs/core/helpers';
import { MailMessage } from '@intentjs/core/mail';

export class InvoicePaidMail extends MailMessage {
  constructor(private order: Record<string, any>) {
    super();
  }

  handle(): this {
    const { user } = this.order;
    const productsList = this.order.products.map((p) => [
      p.name,
      p.qty,
      Num.currency(p.price),
    ]);

    return this.greeting(`Hello ${user.name}`)
      .line(`Thank you for making the payment for the order ${this.order.id}`)
      .table([['Product', 'Qty', 'Amount'], ...productsList])
      .button('Check invoice', 'https://tryintent.com')
      .line('Please let us know if you are facing any issue!')
      .subject(`INVOICE PAID: ${this.order.id}`)
      .preview(`One of your invoice ${this.order.id} has been paid!`);
  }
}
Now to use this class, you can just initialise it like a simple class.
import { InvoicePaidMail } from '#mails/invoice-paid';

const mail5 = new InvoicePaidMail({
  id: 'order_1234',
  products: [
    { name: 'A Table Lamp', qty: 1, price: 1000 },
    { name: 'Coffee Table', qty: 1, price: 150 },
    { name: 'Jade Planet', qty: 2, price: 200 },
  ],
});
Sending mails
Now that we have built the mail, we will now take a look at how can we send emails. The Mail class is used to define the to, cc, bcc and many other such methods.
INFO
MailMessage is used for building mails whereas Mail is used for sending them.
Send
To send a mail, we will use the Mail class. You will first need to initialize the class using the init method.
import { Mail, MailMessage } from '@intentjs/core/mail';

const mail = MailMessage.init()
  .greeting('Hello admin')
  .line('One of your invoices #12345 has been paid!')
  .action('Check invoice', 'https://tryintent.com')
  .line('Please let us know if you are facing any issue!')
  .subject('INVOICE PAID: #12345');

Mail.init()
  .to('vinayak@tryintent.com') // OR .to(['id1@email.com', 'id2@email.com'])
  .send(mail);
Let's say you want to use a different provider other than the default one, you can simply pass the name of the channel to the init method.
Mail.init('transactions').send(mail);In the above example, the mail will now be transported through the transactions channel.
Override Sender
If you want to change the sender other than the one defined in config/mailer.ts, you can use the from method.
Mail.init()
  .from('no-reply@tryintent.com')
  .send(mail);
Marking Carbon Copies
To add cc or bcc to your mail, you can make use of the cc() and bcc() methods passing in an email or array of emails.
Mail.init()
  .to('vinayak@tryintent.com') // OR .to(['id1@email.com', 'id2@email.com'])
  .cc('cc@email.com') // string or string[]
  .bcc('bcc@email.com') // string or string[]
  .send(mail);